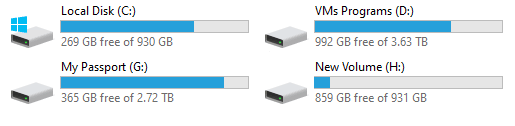
I’ve not always had the money to get the largest hard drive when building my computers or picking one from the store. Often I find myself selecting the smallest size and regretting it later. Here are some steps I’ve learned over the years to free up space and allow Windows 10 to operate more efficiently or free up space when I filled my disk so much that things started crashing. Thankfully Windows 10 makes this easy.
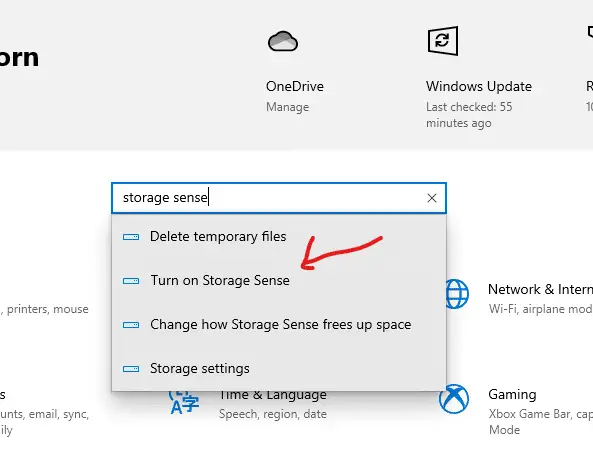
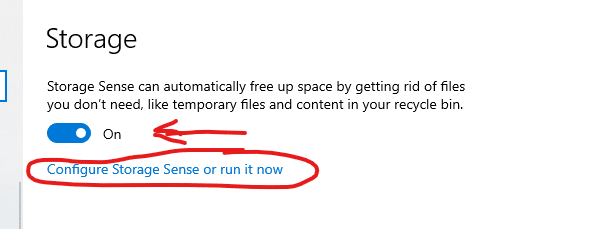
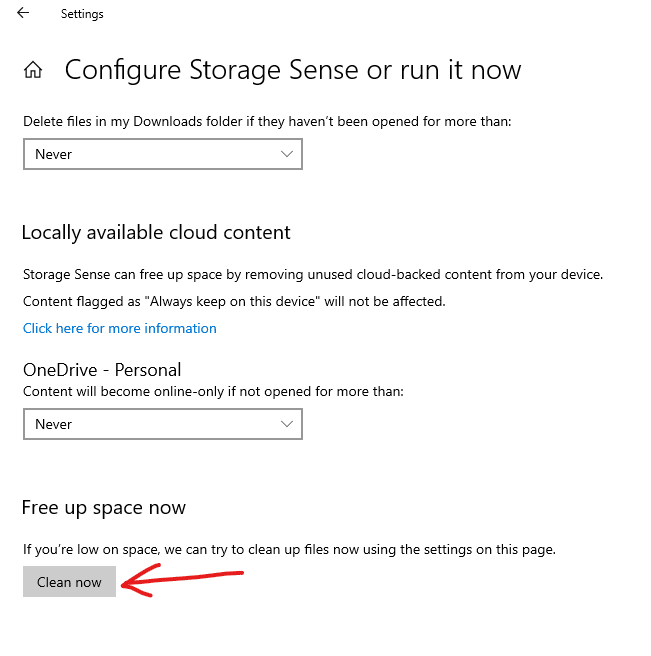
The first and hopefully the only method you need is to open the Settings App and search for Storage Sense. Click the “Turn on Storage Sense” button, and right at the top of the screen, you will see a switch to turn storage sense on and further see a link to “Configure Storage Sense or run it now.” Turn the switch on, then click the link. On the next screen, scroll to the bottom and click “clean now.”
This method will often free disk up enough space to get things going again. Now that you have turned on Storage Sense, it will keep track of your space and automatically remove temporary files and additional free space when possible.
Keep reading, and I will show you the visual version of the steps listed above. Beyond that, I will get into advanced clearing methods that will help you free up even more space if you still have issues.
We will work through several ways to free disk space Windows 10 version. Check out the Windows 11 version coming soon!
Use Storage Sense to Free Space Visual Guide
- Open the Settings App, Type in “Storage Sense,” and click the “Turn on Storage Sense” link.
- Make sure Storage Sense is turned on, then click the link below for “Configure Storage Sense or run it now.”
- Scroll to the bottom of the page and click the “Clean Now” button.
If you still need free space or want to get as much space as possible, keep reading, as I will take you through several steps you can follow to get every precious megabyte back in your control.
Use Disk Cleanup Tool
You can use the Disk Cleanup tool to remove additional files left behind by bloated log files, Windows updates, and more. Run this tool multiple times to clean more than one drive.
Once open, Windows will present you with a window showing the cleaning options and an advanced option to “Clean up system files.” Today we are going to click this button.
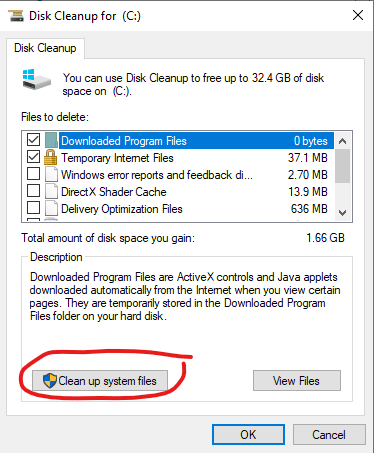
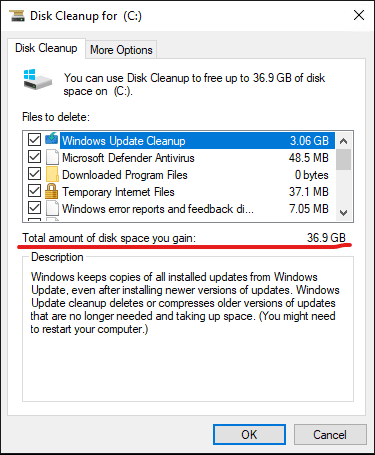
Don’t worry; I will guide you through selecting things that will be safe for 99% of people. Either items that will re-download if needed, such as Windows Update files, or something you don’t need at all, such as Temporary Internet Files. You will notice that I just ran my Storage Sense, and this tool is still able to find several Gigabytes of storage to free up for me.
First, notice that each selected item has a description, allowing you to understand what you will delete. I recommend you read each of these carefully before choosing a section to delete. As you read them, you may notice that most will tell you how important they are and what you might lose.

I selected every item to clear up a massive 36.9 GB of space! You can see this at the bottom right of the selection window under the title “Total amount of disk space you gain:”
Click “OK,” and you will be prompted to confirm that you would like to delete the files:
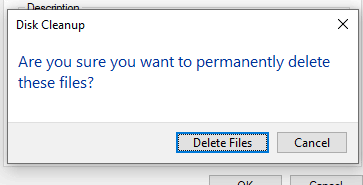
I recommend taking a last look at your Recycle Bin to be sure (check out my article on Managing your Recycle Bin), but often this is not needed, and you are OK to move forward. So once you are ready, click “Delete Files.”
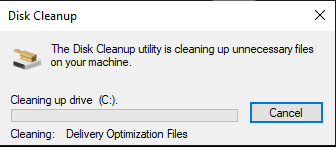
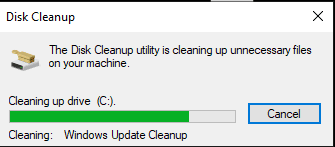
Now you will see a window showing the progress of the deletion process, and once done, the window will close, and you will have much more free space.
Typically, these steps would have been enough to clear up several gigs of space, but if you still need more free space, I’ll walk you through additional steps you can take, so keep reading if you still need more free space.
Deleting Downloaded Items
One of the folders most likely to get bloated on any system is the often-overlooked Downloads Folder. I’m going to walk you through some simple steps to help you clear up the space today and also give you some additional steps to help you manage your Downloads Folder more efficiently, keeping the space free.
The first thing to mention is that when you have something vital that you must keep for any reason, you should move it, print it, or save it externally. Your downloads folder should be a transient place where nothing is safe. Clearing it out often by not keeping essential things in there will help a ton.
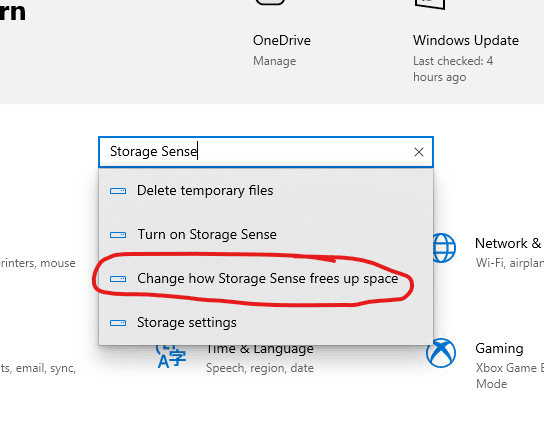
Once you no longer keep essential things in your downloads folder, you can set up storage sense to automatically delete the items after a specific number of days. Start by opening the Settings App and searching for storage sense, but unlike earlier in this post, we are not clicking to turn on Storage Sense, but this time we are clicking to manage the settings by clicking “Change how Storage Sense frees up space.”
Once the Storage Sense settings are open, you can see an option to set the Downloads folder to be automatically cleared after so many days of not using that file.
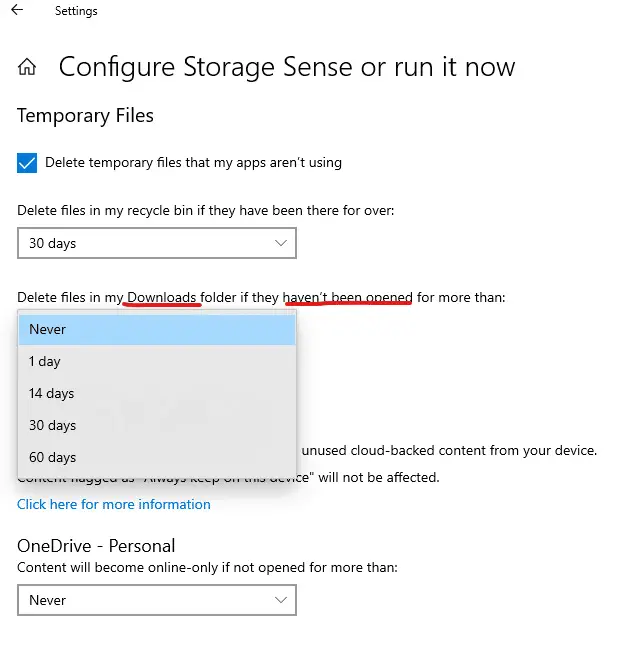
This makes for a straightforward way to manage your Downloads folder!
Keep reading, and I will show you some fantastic tricks for finding and deleting files you might have forgotten on your system.
Finding Old Files and Folders (WinDirStat)
The last way I will cover freeing space in this post is by finding long-lost or forgotten files. To do this, we will use a free program called WinDirStat. This program will scan your hard drive and build a visual representation of the space taken by your files, letting you better decide what you might want to keep vs. what you should get rid of or move to another drive.
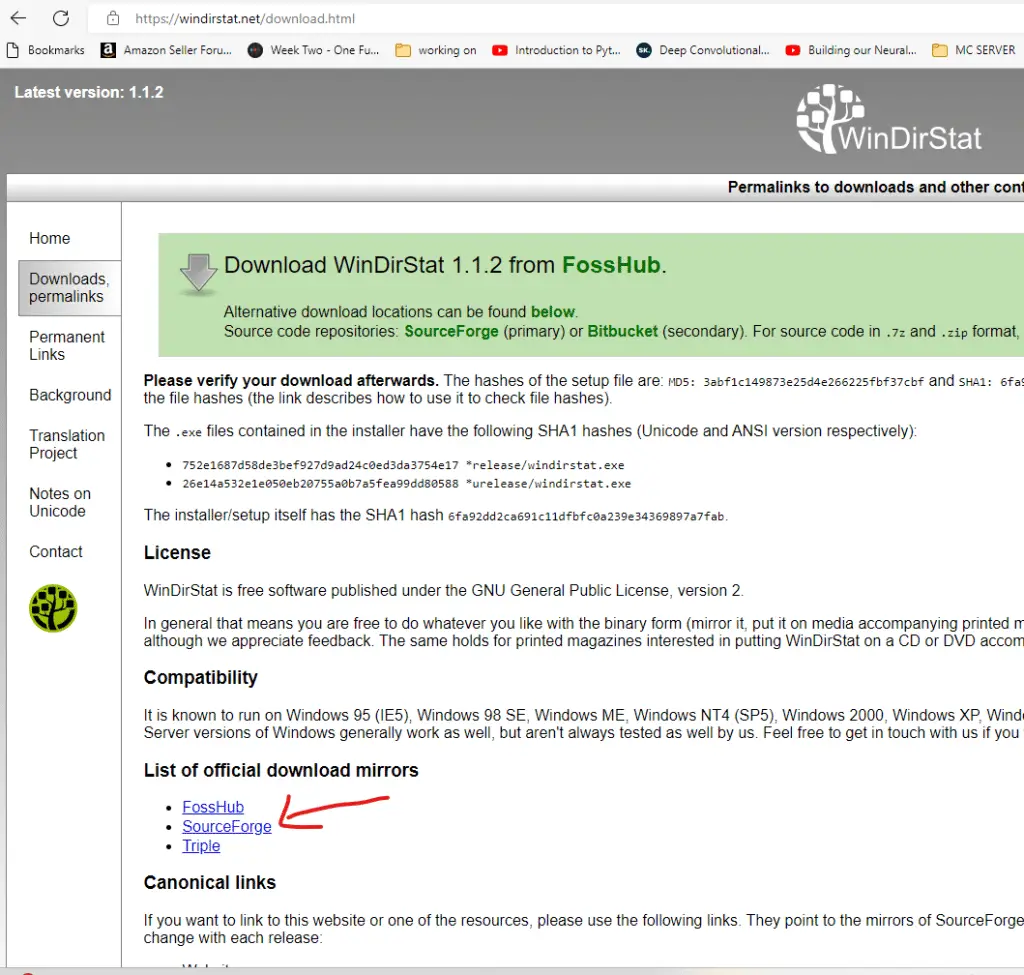
To download this program, you can search for WinDirStat, but many people are linking to fake copies of this program, and I have seen ads for fake versions as well. The official site is https://windirstat.net, an Open Source FREE program. I’m considering hosting a mirror of it for direct download, but I’ll update this text as soon as I decide what to do.
For now, you will want to visit the official website and see who they list as a mirror. Generally, if SourceForge is listed under the mirrors section, that will be the most effortless link to click, giving you a direct download to the program with no trouble.
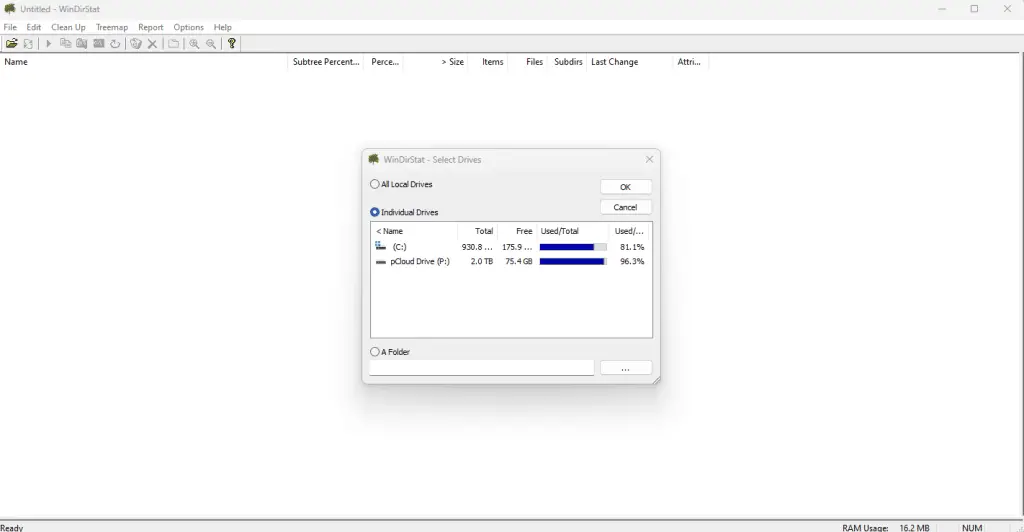
Once you have it downloaded, go ahead and install the program. Once installed, you can run it and select the drive you want to examine to free up space.
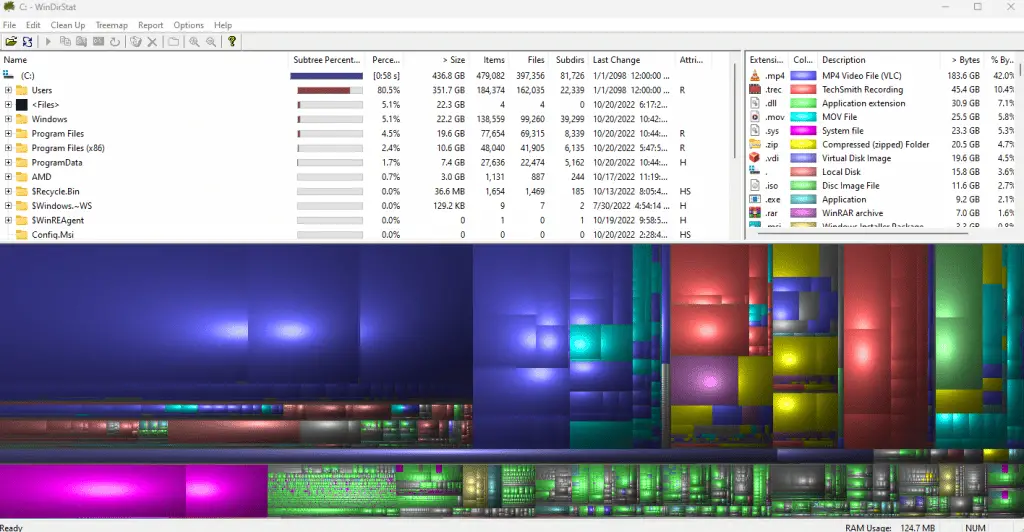
WinDirStat will present you with a graphical representation of the space taken on your system by different files and folders. Clicking on the large blue area, you can see the folder tree in the top window is expanded to show me the path of the item taking the most space.
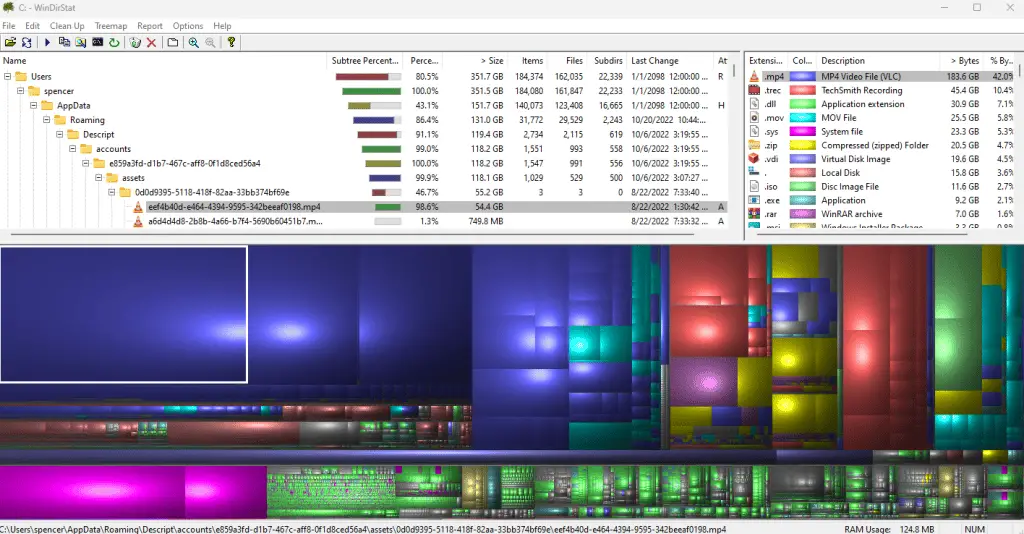
Now I know that if I want to free some space, I can tell Descript (a video editor) to offload some files from my machine. Or I can keep looking around for other large items to delete or move.
Be careful not to delete any system files, but feel free to poker around and see what you can clear up from your machine!